APRS Configuration and Testing
For some countries, such as the USA, it is useful to be able to transmit the balloon's location using APRS,
APRS (Automatic Packet Reporting System) uses amateur radio frequencies (e.g. 144.390 MHz in the USA; 144.800MHz in Europe) to transmit location information and sometimes other data to a network of ground stations. These stations can then repeat the packets over radio, and/or upload to central servers via the internet.
Transmission on APRS frequencies requires an amateur radio licence, and typically even the basic one ("Technician" in the USA) is enough. Use without an applicable licence is illegal. Further, in some countries (such as the UK) no amateur radio licence allows use of these frequencies from an airborne vehicle, so APRS is not useful for tracking balloons in these countries.
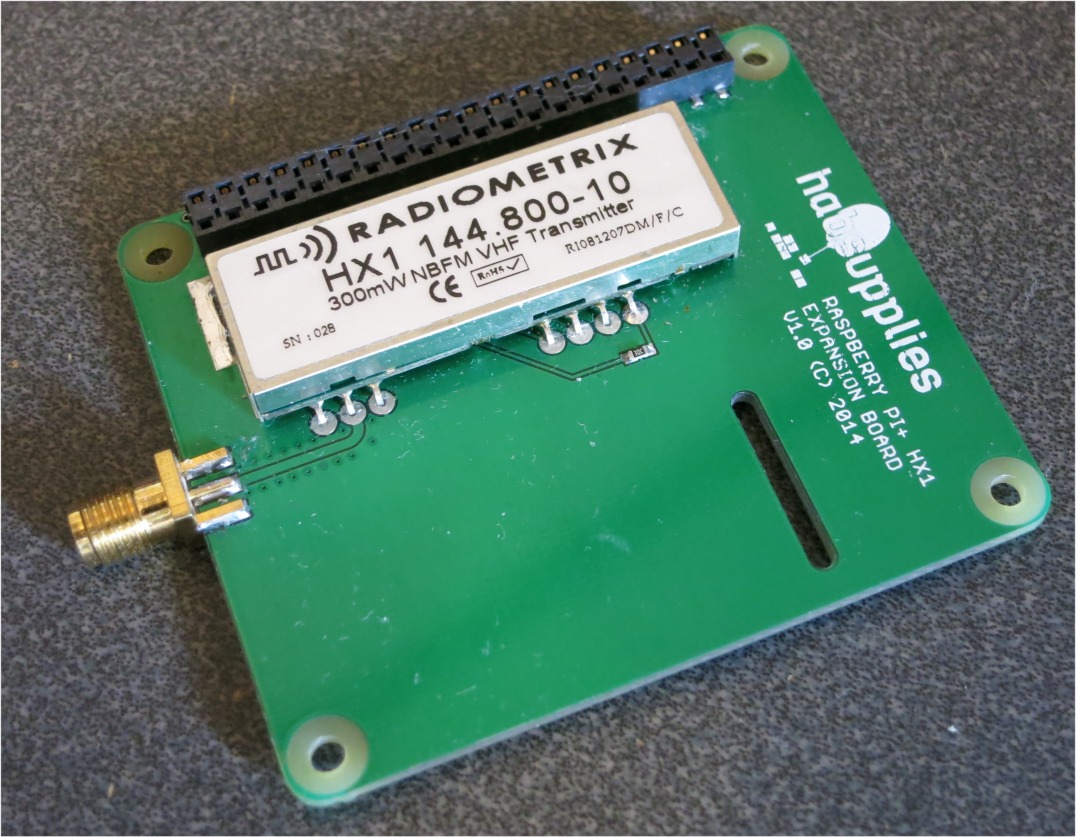
We have developed a Pi add-on board and software that together add APRS capability to the Pi In The Sky telemetry board (this example has the 144.8MHz transmitter for use in Europe)
So to use APRS to track your balloon you need:
- Pi In The Sky Board
- APRS add-on board
- APRS version of the Pi In The Sky software
- A suitable amateur radio licence that gives you permission to use APRS airborne in your country
- A suitable APRS receiver/decoder (see below)
Add-on Board
Be sure to order the correct board for your country (see the list here.
Software
Follow the usual instructions to set up the SD card with the PITS software.
Configuration
There are some addition settings which relate to APRS. See the main confiiguration page for how to edit the settings file, and what the other settings are.
- APRS_Callsign=<your_callsign> - Replace <your_callsign> with your amateur radio callsign. If you don't have one then stop right now and get one!
- APRS_ID=11 - "11" is the usual ID for balloons. You should change this if you're flying 2 balloons at the same time with the same callsign, so each flight has a different ID, but otherwise leave at the default Spinal Tap setting.
- APRS_Period=1 - This is the period in minutes between transmissions. We chose minutes not seconds so it's not possible to use very short gaps and thus flood the network.
- APRS_Offset=10 - Sets the time in seconds to delay before sending a packet (see explanation below).
APRS_Random=5 - Sets a random time (0 - 4 seconds in this example) to add to the time that each packet is sent.
The timing works like this: if Offset and Random are set to zero, and Period to 1, then packets are sent at midnigt, 1 minute past, 2 minutes past, etc. i.e. 00:00:00, 00:01:00, 00:02:00. If the Period is 2, then the timings are 00:00:00, 00:02:00, 00:04:00 etc. Now, if the offset is 10, they will be 00:00:10, 00:02:10, 00:04:10 etc. So it is possible to set how often the transmissions happen and when they happen.
If you are part of a group launch, or you know of other APRS flights in the area, then you can use these settings to avoid the APRS packets conflicting (i.e. transmitting at the same time).
If instead you are flying alone, there may still be conflicts with other APRS transmissions including ground-based ones. It is posisble that your transmissions permanently coincide with those from another transmitter that uses the same time settings. To avoid this, use the Random parameter to add a random delay before each packet.
Receiving
Receiving APRS is both cheap and easy. You need:
- 144MHz (2m) antenna
- 144MHz receiver
- Audio cable
- PC
- APRS decoding software
For a chase car, a dual-mode 2m/70cm magmount antenna is ideal. A suitable receiver is a Baeofeng UV-5R, or pretty much any radio scanner that has an FM (narrow, not wideband normally called WFM) mode. Connect to a laptop line-in socket using a suitable cable, on which you can use an APRS decoder such as Direwolf.
Alternatively, you can use an SDR and VNC software instead of the radio and audio cable.
Important
If you have a monitor connected to the Pi via HDMI, this will prevent APRS from working (it redirects the sound output to HDMI instead of PWM). So, if the APRS signal is just a carrier with no modulation, remove the HDMI cable and reboot. Or (though we have yet to test this) you can achieve the same by using raspi-config to direct audio to the audio jack instead of HDMI.
Testing
For the following test, I used an AOR AR8000 scanner and Direwolf software on a Windows PC.
I set the scanner to 144.800 MHz (the APRS frequency used in Europe), and "NFM" (Narrow FM) mode.
I then configured the PITS software, adding my amateur radio callsign to the APRS section (see above), and then started the PITS software. Provided that the PITS tracker has a GPS lock, then it transmits one APRS packet every 1 minute (unless configured otherwise), and this shows up on the RPi monitor like so:

When this happens, the FM receiver should play the packet, which will sound something like this.
Once this was working, I connected the scanner audio output to the front-panel audio input on my PC, and installed Direwolf software. This software needs very little configuration; it needs to know:
- Your amateur radio callsign
- Your APRS passcode (which you can generate from your callsign here.
- Which audio input device to use (i.e. the one that the radio is connected to).
With these items configured, I ran the software which started up like so:
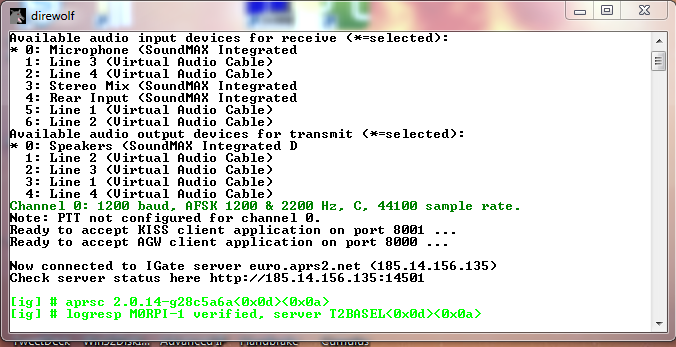
Note the "*" against the active audio input device. If this is on the wrong device then close the program, reconfigure, and try again. Once it's correct, then wait for the PITS tracker to send its position again. When this happens, the result should appear in Direwolf. If it doesn't then try turning the radio volume up. Here's what you should get:

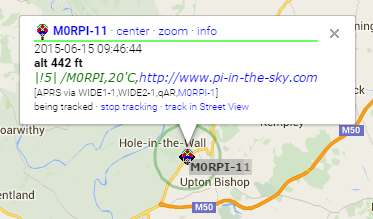
At this stage, the balloon position has been uploaded to the APRS infrastructure, and appears on the APRS map. To find it, type in your tracker callsign (including the SSID - e.g. M9XYZ-11 - in the "Track callsign:" search box. Here's what I saw when I did this:
Published on