
Getting On The Map
Obviously it's not enough to get your transmissions decoded - you need to get your payload's position showing on a map so you can see where it is.
How this works is that dl-fldigi uploads your receeived data to a server (provided you've ticked the "online" option in dl-fldigi). This server then receives each sentence that your tracker transmits, however it doesn't (as yet) know what your sentence means. This is because trackers can send different "fields", not just position data (latitude, longitude, altitude) but also temperatures, pressure, humidity and many other items that might be interesting to see. To tell the server about our sentence format, we use a "Payload Document".
These documents are created using an online form.
To simplify the process, we have created a sample document which you can use as a basis for yours. So, to create a new document based on our existing one, click on the "Start from existing" button:

After clicking that button, you will see a list of existing payload documents, with a search box at the top. Type in "PI_SKY_PLUS" in this box:
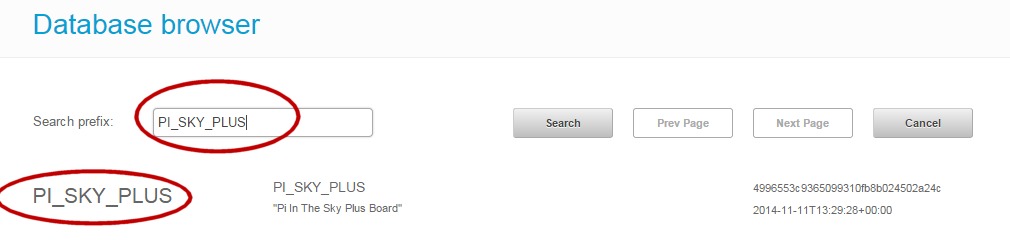
and then click on the selected line below (second elipse). You will then see your new payload document that you need to edit and save.
There are some things that you must change, otherwise you risk interfering with someone's existing setup (mine!). First, set the "Payload name" to be something meaningful and unique to you:

The next section describes your radio transmissions. The main one is the frequency, which should match whatever you chose in /boot/pisky.txt. If that is different to what is shown here, click the Edit button and change it:

The final section will always need changing:

This shows the "Payload ID" which you must change in /boot/pisky.txt to be something unique, and must change here to match. Click the Edit button so show the edit page:

and then change the description and (vital) the "Callsign". Click the Save button at the bottom when you're done.
This will take you back to the main edit form, where you should click on "Save" to create your new payload document. You will be shown a reference number which you should keep for later (creating a flight document). For now though, you have done enough to get the tracker on the map.
So, provided that:
- Your tracker is running
- It has a GPS lock
- You are receiving and decoding in dl-fldigi
- You checked the "Online" button in dl-fldigi
- You have an internet connection
- Your payload document was saved
- Your payload document matches your tracker settiings
then your tracker should appear on the map.
If it doesn't asppear within a few seconds, then check the logtail which should tell you what is wrong. The usual reason for failure is that the number of type fields sent by the payload do not match those in the payload document. By default, the PITS software sends the following:
- Sentence Counter - Integer - Auto-incrementing number that starts at 1 and increments by 1 for each new sentence.
- Time - UTC time in the format hh:mm:ss. This is the same as GMT and is 1 hour behind BST
- Latitude (decimal)
- Longitude (decimal)
- Altitude in metres
- Horizontal Speed in m/s
- Heading in degrees
- Satellites - Number of satellites used in producing position fix
- Internal Temperature in degrees C (as measured on the PITS board)
- Battery voltage (V)
- Battery current (mA)
Caveats:
- If you are using the PITS Zero board, then the battery voltage and current are not sent.
- If you are using the original PITS board on the model A or B, then the battery current field is not sent.
- If you have added a BMP085/180 PT sensor, then the temperature and pressure will be appended to the above fields.
- If you have added an external DS18B20 temperature sensor, then the temperature will be appended to the above fields.
Published on